
10+ Tips to Work with Natural Light for Travel Photography
Travel Tips, Photography Tips / March 11, 2025 / 8 comments
Looking to improve your travel photography? As someone who does not edit her photos, it’s essential that I use what the world puts in front of me. Whether that is buildings, nature, or just the sun, it all plays a role in photography. Being able to use all of it means that we get to capture incredible skies, shadows, and more. Natural light plays a crucial role in creating breathtaking images that evoke emotion and tell a story. Understanding how to harness this lighting can elevate your photography from simple snapshots to stunning artwork.
Traveling allows you to explore diverse landscapes, cultures, and moments that beg to be photographed. Yet, the key to capturing these experiences lies in knowing how to work with the light you have. Mastering natural light, from the soft glow of dawn to the dramatic shadows of sunset, can transform your photos into powerful visual narratives. It’s also about photographing in shadows and clouds (because the one thing we can’t control on our travels is the weather!) – using the light source we have to our benefit.
I’ll give you over ten essential techniques for working with natural light in travel photography. Each tip will help you make the most of your surroundings and improve your ability to capture the beauty of the world around you. Be sure to check out my other photography tips to improve your camera skills!
This post contains affiliate links. This means if you purchase something from a link, I may make a small commission, at no cost to you. This helps me keep the site running and free.
If you like this post, be sure to sign up for my e-mail list for travel inspiration & tips, or connect with me on Facebook, Instagram, Twitter, BlueSky, Threads, or Pinterest. I also have a Facebook group where you can ask me anything travel related – and I share travel deals!
1. Golden Hour: Embrace the Magic Light
Golden hour occurs during the hour before sunset and an hour after sunrise, casting a warm, golden light that improves the beauty of photos. During this time, the Earth’s atmosphere filters out blue light, resulting in warmer and more colorful images. This special lighting is perfect for portrait and street photography as it flatters subjects with its soft glow.
Photographers often find golden hour beneficial because more people are out and about, particularly around sunset when locals finish work and engage in evening activities. To maximize this magical light, explore unique elements in your surroundings to enrich your compositions alongside the setting sun. By doing so, you can capture vibrant colors and deep shadows, creating captivating images.
Golden Hour is a favorite among professional photographers because it enhances the natural beauty of scenes without harsh shadows. Make sure to adjust your camera settings to embrace this soft light, and experiment with different angles to take full advantage of this time. Check out my full guide to sunset photography for an in depth look at this time.

2. Blue Hour: Capture a Soft, Mystical Feel
The blue hour is a magical time in photography that occurs just before sunrise and after sunset. It’s similar, but different, than the golden hours. During this period, the ambient light is reduced, offering a unique opportunity to capture soft, mystical images. Landscapes and seascapes particularly benefit from the vibrant colors and the glow that characterize this time.
Photographers aiming to shoot during the blue hour often face low light conditions, making a tripod essential for stability. High ISO settings might also be necessary to bring out more detail and vibrancy. Longer exposure times can help create deep, rich colors while still capturing the ambiance of this transitional time.
This time of day blends elements of both daytime and nighttime photography. It’s a perfect moment to photograph scenes featuring stars, the moon, and vivid colors against the twilight sky. Utilizing these features can result in atmospheric images that transport the viewer into a dreamlike world.
3. Golden/Blue Hour Shadows: Add Texture and Depth
Understanding how to use shadows during the golden hour can greatly improve your travel photography. During this time, light is warm and glows with rich colors like orange and magenta. This sideways direction of light creates gentle, deep shadows that add texture and depth to your images.
When capturing portraits or landscapes, these shadows give your photos a more dynamic and three-dimensional look. This is because the golden hour’s interplay between light and shadow highlights the natural contours and features of your subjects. This effect makes surfaces and objects appear more vibrant and interesting.
To make the most of this, observe how shadows fall on your subject matter. Position yourself and your camera to best capture these shadows without them overwhelming the main features. By focusing on this balance between light and shadows, your photos will have a more professional and aesthetically pleasing quality. Using the natural landscape to add texture can help add depth to your image so the viewer can actually feel like they are there instead of looking at a photo. Doesn’t this photo of the sunset in Lugano transport you to Switzerland?

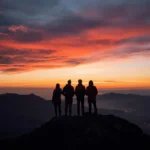
4. Use Backlighting for a Dramatic Silhouette
Backlighting can transform an ordinary photo into an artistic masterpiece by surrounding your subject with a glowing halo. This technique is especially effective in creating dramatic silhouettes, adding depth to your travel photography. For the best results, shoot just before sunrise or after sunset when warm colors and soft light enhance the subject.
When capturing silhouettes, it’s crucial to expose the bright background. This ensures that the subject appears as a striking dark figure against the illuminated backdrop, creating a powerful contrast. Be aware that poorly composed backlit photos might turn into nondescript silhouettes, so mastering your camera settings is key.
To add detail to your silhouette shots, consider using reflectors. They can provide just enough light on your subject’s face to maintain recognition while keeping the ethereal glow intact. With practice, backlighting can significantly elevate your travel photos, giving them a unique, dramatic appeal.
5. Look for Natural Reflectors in Midday Light
In midday travel photography, the sun can create harsh overhead light and deep shadows. To tackle this, use natural reflectors like sand, water, or bright walls to redirect light onto your subject. These reflectors soften harsh shadows and enhance color saturation, making images more vibrant.
6. Overcast Skies: Capture Soft, Even Lighting
Overcast skies offer soft, even lighting that enhances delicate details and creates a tranquil mood in photographs. While some might dismiss this light as dull, it provides opportunities for capturing vibrant colors against a subdued background. Embracing the softness of overcast lighting can refine your shots, making them feel more gentle and sophisticated.
Adjusting the white balance is crucial in these conditions to prevent unwanted color casts and ensure accurate color representation. By doing so, you can maintain the natural hues of your subject, making your images look more authentic and appealing.
Overcast days should not be feared but rather embraced by photographers to unlock subtle and gentle compositions.

7. Find Shade in Harsh Midday Sun
Midday sun can be harsh, creating deep shadows and reducing color saturation in your travel photography. Instead of shooting directly in this light, find shaded areas to capture more balanced and flattering images, especially for portrait photography. Shaded spots help diffuse the light, resulting in even distribution and better image quality.
When photographing people, ask your subjects to step into the shade. This simple move avoids the harsh shadows that overhead sunlight often causes on faces. Shooting in the shade helps maintain more natural, vibrant colors and improves the overall aesthetic of your photos.
Look for trees, buildings, or any structure that can provide cover from direct sunlight. d Shade doesn’t have to just be for the sun, adding in background to the photo makes it more interesting.
8. Know Your Landscape
In a perfect world, a photographer would visit the location before the shoot. However, with travel that is not always possible (and a lot of time we only have one opportunity to visit the place). So knowing our landscape looks a bit different – it’s researching destinations ahead of time.
Whether that is through a search engine or Instagram, getting photography inspiration for your trip is important. You’ll find out where people go to get the best shots – and when! I knew I wanted to see a sunrise in Hawaii, but I wasn’t sure where. After researching a number of great spots, I found Laupāhoehoe Point. I loved the contrast of the dark lava rocks with the sunrise in the background. Of course, the weather didn’t cooperate until after sunrise, but we still got some amazing shots!

9. Use Directional Light to Add Drama
This is related to knowing your landscape – knowing how the light comes across the landscape is important. Side lighting is excellent for adding depth and texture, helping your subject to appear more dynamic and engaging. This type of lighting is perfect for capturing the intricate details of architecture or the rugged textures of landscapes.
Backlighting can create striking silhouettes or highlighted edges, adding drama to your shots. It is particularly effective during the golden hours, just after sunrise or before sunset, when the light’s angle is lower. However, be cautious as backlighting can often lead to a blown-out background, which may require adjustments in post-processing.
Front light is ideal for portrait photography as it evenly illuminates the subject’s face, minimizing imperfections and creating a flattering effect. While top light can cast unflattering shadows, it is useful in scenarios where you want to capture expansive views, like fields or beaches. Mastering these lighting techniques will enable you to manipulate mood and depth in your photos, making them stand out. Remember, the direction of light can transform a simple shot into something extraordinary.
10. Adapt to Natural Light Changes for Dynamic Shots
Adapting to natural light changes is key for dynamic shots in travel photography. Natural light varies with the time of day, season, and direction, offering different moods and tones. As a travel photographer, adjusting your approach to these shifting light conditions can enrich your images.
Spencer likes to tease me that my camera is always attached to me, but this is why. The light that I see going into a restaurant for a meal can be very different than the light that I see when I come out. Being prepared for natural light to change (and sometimes change quickly) is a key part of travel photography.
11. Don’t be afraid to drone
It’s no secret I love my drone shots. It provides new perspective on landscapes that I wouldn’t have seen otherwise. When it comes to using natural light though, it’s a great way to capture the light on buildings. On this castle in San Marino, not only did we get a nice perspective, but we got to see how the light shines off of it. I will tell you that it looked VERY different than where I was standing!
Many photography drones (like our Dji 4) have collision detection, so even in lower light, I feel comfortable flying it.

Final Thoughts
Mastering the art of natural light in travel photography can elevate your images from ordinary to breathtaking. By understanding the characteristics and dynamics of light—such as the advantages of golden hours, the subtleties of shadows, and the importance of adapting to shifting conditions—you can create photos that not only capture the beauty of your surroundings but also evoke emotion and tell a story. Whether you’re utilizing frontlight for flattering portraits, experimenting with backlighting for striking silhouettes or embracing the aerial perspective of drones, each approach can unveil a unique aspect of the scene before you. Good luck taking beautiful travel photos!
Save “How to Use Natural Light in Travel Photography” for Later


About the Author
Read More About Travel Tips


8 responses to “10+ Tips to Work with Natural Light for Travel Photography”

Some really useful information here! I think I do a lot of this, but i’m still also learning too. I use an iPhone camera and will often go back and forth between portrait mode and regular photos, and I recently started using, what I like to call a “backward zoom” where it takes a more wide angle photo without the need to use a panoramic mode. I have also recently purchased a drone and i’m teaching myself to use it! Great shots in this post.

Such a good post with great photography information. As an amateur photographer, it was great to be aware of these amazing tips to improve my photos. I will surely put an effort and try these tips out and see how it improves. Thank you very much for sharing.

I’m always looking for ways to improve my photography, and you’ve given me great tips here. I always enjoy the golden hues of Golden Hour but haven’t done enough playing with my drone. It’s my goal to fly more and become more comfortable with it. I have been using my Pixel phone camera more often as carrying my “big” camera gets heavy and my old shoulders feel it. There are some shots that demand a better zoom and more control over the settings, so I will always have it with me.

I really enjoyed reading these tips. We knew about Golden Hour but didn’t know much about Blue Hour which adds a very different dimension to the soft, warm tones of Golden Hour. I love how you encourage embracing those overcast days and making the best of the light you have. We don’t have a drone but I have tried using a friend’s drone, with crash-tastic results. (Ooops!) Maybe we need some practice, because I really love the perspective you can gain from above…

Photography is one of my favourite pastimes. I don’t edit my photographs either so I was excited to read your post.
I always try and see a sunset or sunrise everywhere I visit and agree they are wonderful times to take photographs. As I have a great view from my balcony, I regularly set the alarm for before the sunrise so I can enjoy the view. It’s amazing how different it can be from day to day.
I don’t usually consider the blue hour much when planning on take some shots but I am going to compare some now to the golden hour.
Lots of times I am travelling during overcast days so I was happy to read how you cope with that. Your photograph of the Skogafoss Waterfall in Iceland is really beautiful.
Your trips on using directional light are great. I hope to continue to improve how I use it.
It was great to read this post and get your tips – thanks for sharing them !

I love your tips on how to utilise natural light for your travel images. Golden hour has worked for me pretty well and I nodded in agreement with your tip on finding shade during mid-day sun. Your suggestion to adjust the white balance when shooting on overcast days is an advice I’d like to follow for next time, especially now that it is winter most days are quite gloomy but I need to get content and often my images have turned out rather dark.
Carolin | Solo Travel Story

Taking pictures outdoors and getting good results is always a task that requires some experience. Trial and error is a natural and fundamental process, just as it is essential to understand the play of light and shadow. It can be frustrating at first, but it ends up being rewarding once you understand how it works.
These tips are very good and quite effective for taking pictures while traveling, especially for those who want to produce landscape photography.
I love taking photos but my results can sometimes be hit and miss as I’m not too up on the technical side of things. Your explanations about how to use the natural light are really helpful. I have found some of these already myself but it’s good to highlight others. I’m more of a sunset person than a sunrise, so love getting photos around this time
Have You Seen These Yet?

Hey there! I’m Pamela. Just a woman who has fallen in love with getting lost around the world. I’ve traveled to 42 countries across 7 continents.
My mission? To inspire you to ‘let the bucket list flow’ and see what the world has to offer.
My promise: All of my photos are not edited. What you see is what you get.
Join a small-group safari to Kenya & Uganda!
- Go trekking and get close to gorillas and chimpanzees
- See the big 5 Safari Animals
- See The Great Migration
- Sunrise hot air balloon ride and champagne breakfast included
- Maximum of 12 guests
Capital Cities book

- Discover the world through this 258 page book covering 118 cities
- 3 photos by me!
- Perfect as a gift or for your coffee table
Travel Shop
- Accommodation Comparison Excel
- Printable Bucket Lists
- Travel Planning Resources
- & More!
Leave a Reply