
Have You Seen These Yet?


Hey there! I’m Pamela. Just a woman who has fallen in love with getting lost around the world. I’ve traveled to 42 countries across 7 continents.
My mission? To inspire you to ‘let the bucket list flow’ and see what the world has to offer.
My promise: All of my photos are not edited. What you see is what you get.
Join our small-group Tour to Tanzania 2026!
- Witness the breathtaking Great Migration
- Enjoy an exhilarating walking safari and hot air balloon ride
- Unwind on Zanzibar’s beautiful beaches
Capital Cities book
- Discover the world through this 258 page book covering 118 cities
- 3 photos by me!
- Perfect as a gift or for your coffee table
Join Newsletter
Get weekly travel tips, featured destinations, and more! Let’s get lost together.
How to Plan a Trip with Google My Maps
General Travel Tips, Travel Tips / March 11, 2025 / 9 comments
Google My Maps is one of my favorite tools for planning a trip. You’ve probably seen the maps around the site for you to use as well. Those are Google My Maps (which we’ll get into the difference below), but overall both are great tools for planning. It can be a little confusing to use, which is why I wanted to put together this guide on how to plan a trip with Google My Maps, including photos, so you can feel comfortable with this valuable tool!
I love using Google My Maps to plan a trip even as an idea. I have so many maps of different places that I would like to visit eventually. It’s really a great way to see places and save information for travel.
Most people just use it for a road trip itinerary or a driving route, but it’s a great way to assess the length of a day trip or public transportation. Not to mention the ability to download offline maps in case you don’t have service.
This post contains affiliate links. This means if you purchase something from a link, I may make a small commission, at no cost to you. This helps me keep the site running and free.
If you like this post, be sure to sign up for my e-mail list for travel inspiration & tips, or connect with me on Facebook, Instagram, Twitter, BlueSky, Threads, or Pinterest. I also have a Facebook group where you can ask me anything travel related – and I share travel deals!
Why Use Google My Maps for Trip Planning?
Google My Maps is a powerful tool for trip planning, offering a wide range of features and benefits that make it an essential resource for travelers. Whether you’re exploring a new city, embarking on a road trip, or simply trying to navigate your way around town, Google My Maps provides detailed and accurate information to help you make the most of your journey. From real-time traffic updates and GPS navigation to local business reviews and recommendations, there are countless reasons why using Google My Maps can enhance your travel experience.
Google Maps vs. Google My Maps
There is an important distinction to be made between Google MY Maps and Google Maps. This post is going over Google My Maps. I prefer it for being on the move. Google My Maps is good for showing an itinerary – it is what I use on this site to show you where locations are. It’s a link to a map, but you can’t get directions on it.
Google Maps is similar, but with directions, and the ability to download the map offline – perfect for when you’re traveling without data! You have limited stops in Google Maps, but you can put in over 2000 things on My Maps. (Not that the names are confusing or anything, thanks Google.)
How to Create a Trip Plan On Google My Maps [Step-by-step Guide]
I’m going to walk you through the process of how to plan a trip plan on Google My Maps, from setting your starting point to adding multiple destinations, and even sharing the plan with your fellow travelers. Whether you’re planning a road trip, a vacation, or a simple weekend getaway, this guide will help you make the most out of Google Maps to ensure a smooth and well-organized trip. So grab your laptop or phone, and let’s get started on creating your perfect travel itinerary!
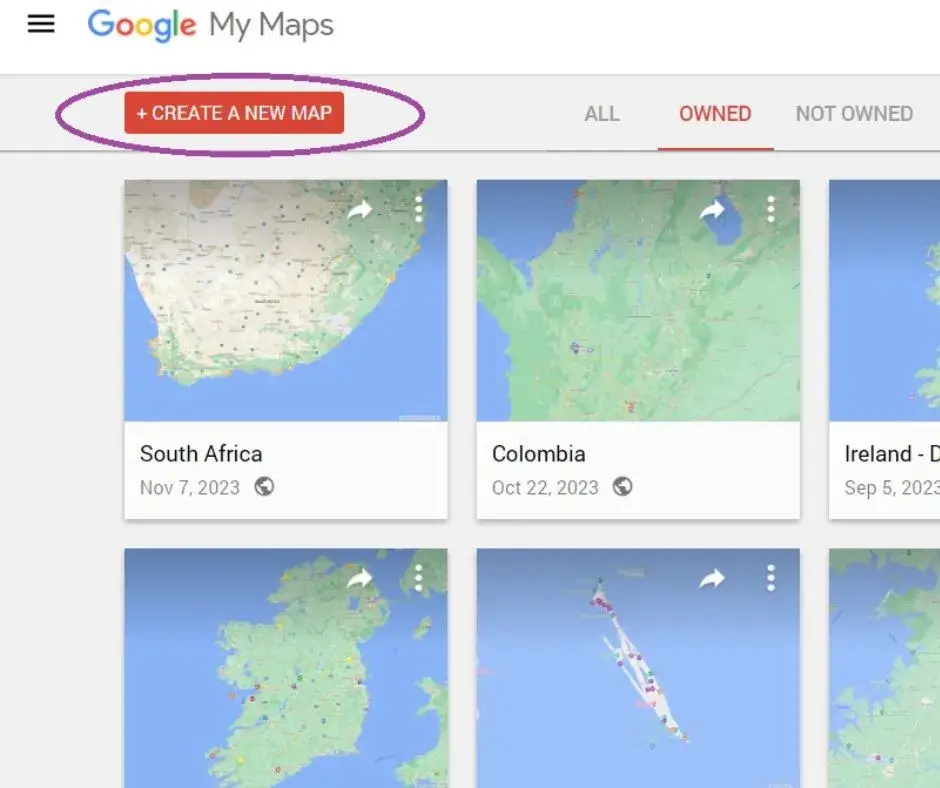
1. Create a Map
To create a new map in Google My Maps, start by accessing the Google My Maps website or app. Once on the Google My Maps interface, look for the “Create a new map” option, usually located on the side menu or in the top left corner. Click on this option to begin creating a new map.
Next, a new page will appear where you can enter a name for your map in the given field. Simply type in the name you want to give to your map and then click “Save” or “Create” to confirm the name.
After naming the map, you can also add a description by clicking on the “Untitled Map” text at the top of the page. This will allow you to provide a brief description of what the map is for or what it represents.
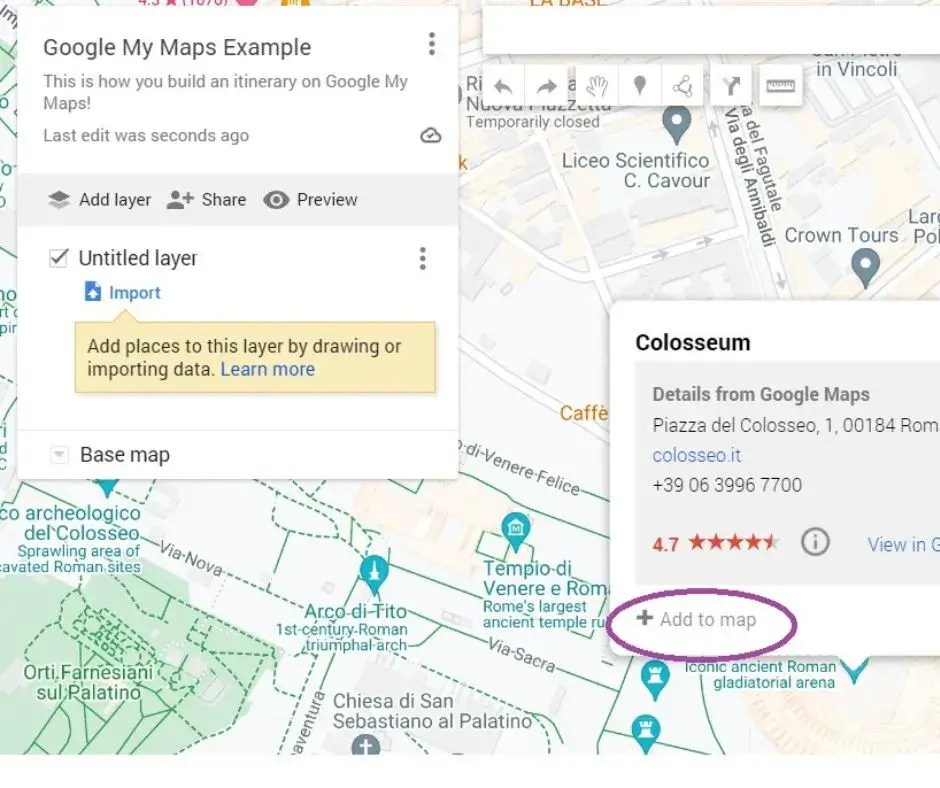
2. Add Locations
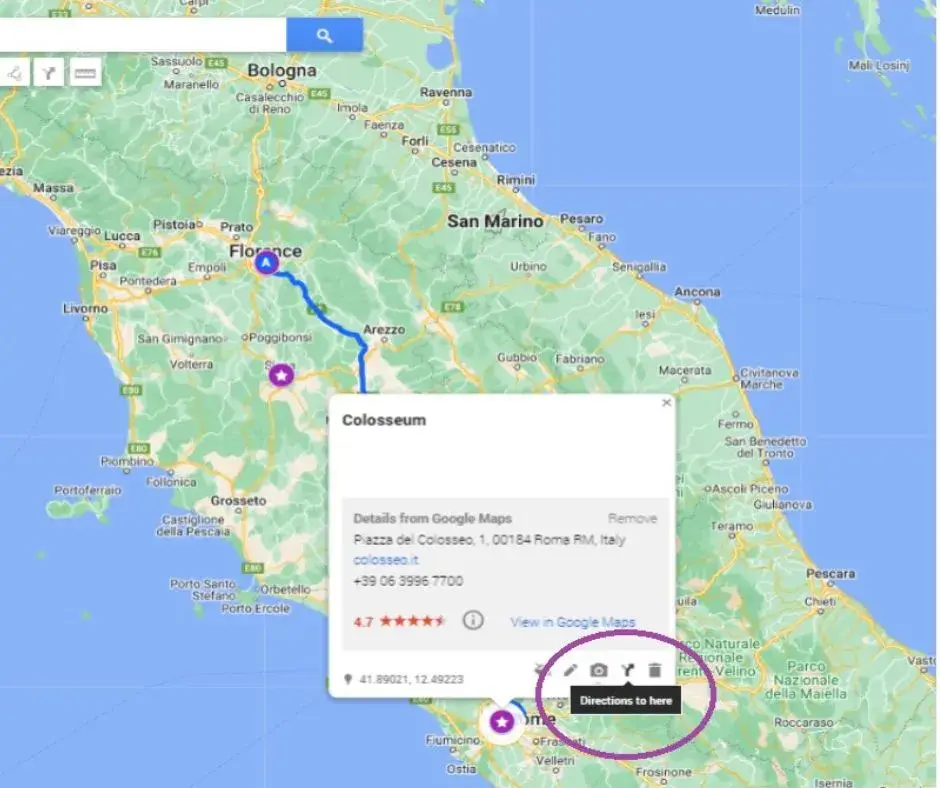
To add locations to your Google My Maps, you can simply type the location into the search bar and click on “Add to map” when the location appears. Alternatively, you can use the “Add Marker” tool to manually place a marker on the map.
To include the starting point and destination, click on the search bar and enter the details of both locations. Then, click on the blue button for “Directions” to generate the route between the two points.
If needed, you can click and drag the location pins to adjust their placement on the map.
3. Customise Your Categories (Icons and Colours)
To customize your categories on Google My Maps, start by clicking on the “Style” option on the left-hand side of the menu. Select the category you want to customize, such as things to do, photography spots, restaurants, cafes, hotels, and shops, and then click on “More options” to change the color and add an icon for each category. Utilize different colors and icons to easily differentiate between different types of places on the map. For example, you can choose a green color and a camera icon for photography spots, a red color and a fork and knife icon for restaurants, a blue color and a bed icon for hotels, and so on. This will make it easier for you to navigate and identify different types of places on the map. By customizing the icons and colors for your categories, you can personalize your Google Maps experience and make it more intuitive and visually appealing.


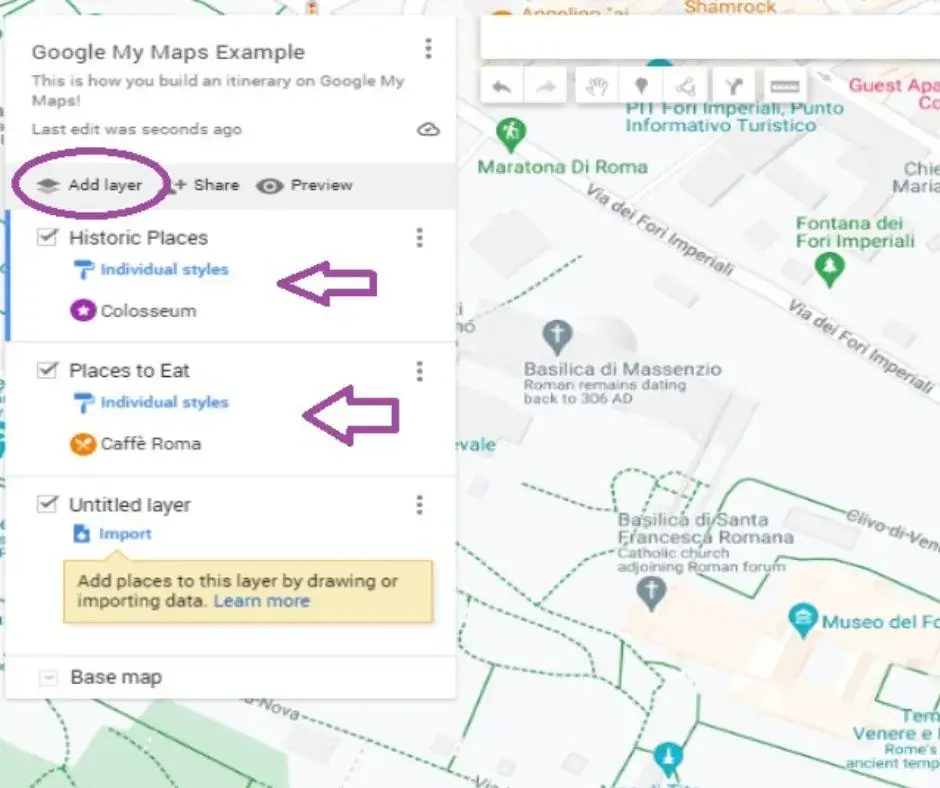
4. Create Layers
To create layers for your map, start by clicking on the “Add layer” option in the sidebar. This will create a new layer that you can use to organize your locations. You can then rename the layer to better categorize the locations it contains and delete any layers you no longer need. Making layers invisible can help declutter your map and focus on specific categories. I also love to use color codes to help me easily find something.
To move points of interest between layers, simply click and drag the location pin to the desired layer.
Layers can help categorize and organize locations for your trip. For example, you can create layers for different attractions, restaurants, or hotels. This will make it easier to view and manage the different aspects of your trip. You can add up to 10 location pins per layer and create up to 10 layers per map, giving you plenty of freedom to organize your trip effectively.
5. Plan Your Itinerary (with Directions)
Enter your starting point and destination (or end point), then add the stops along your route. Create a layer for each stop and add pins for points of interest such as attractions, restaurants, and activities. This will help you efficiently organize and visualize your itinerary. This is a key step of how to plan a trip with Google My Maps – saving all those top places to see and eat!
Utilize Google My Maps to research and save points of interest along your route. You can also include accommodations, gas stations, and rest areas to ensure a smooth trip. Once your stops and points of interest are added, you can easily drag and drop to rearrange them in the most efficient order.
For each stop on your trip, use the directions feature on Google Maps to get a turn-by-turn navigation. This will help you plan your route and estimate travel time between each stop.
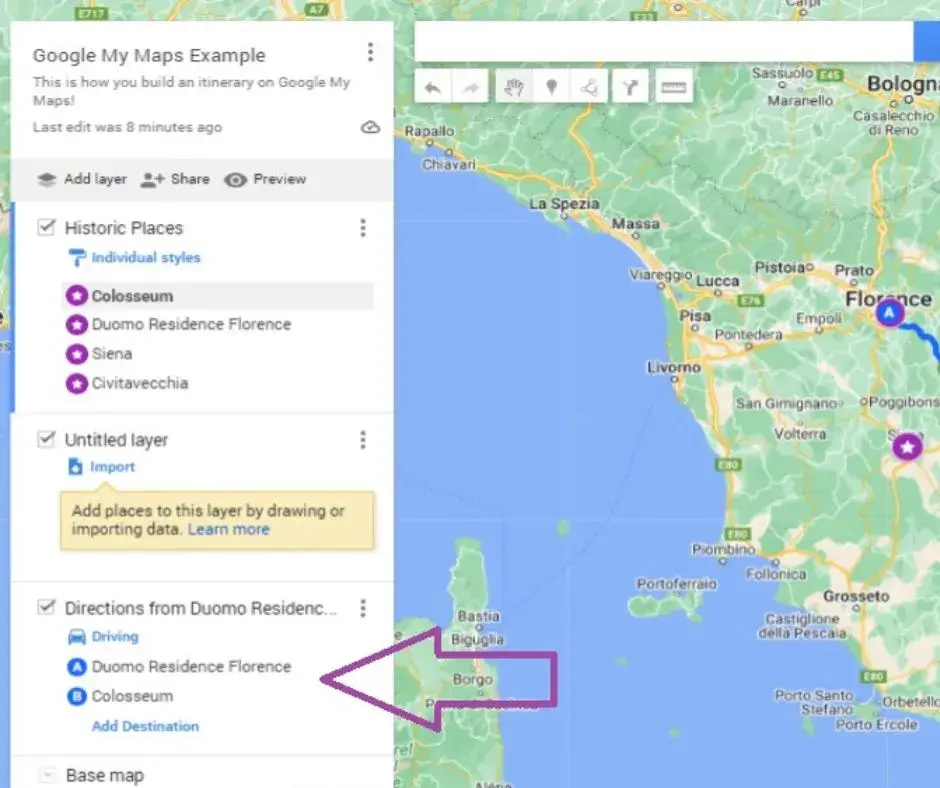
Add Directions
To add directions to a map, first click on the arrow icon underneath the search bar to create a new directions layer. Then, in the legend, add locations or addresses to Points A and B. You can continue adding more points by clicking on “Add Destination” on the map. If you need to rearrange the order of the points, simply drag the items around in the legend to modify the route as needed. This allows you to easily customize the route to include all necessary stops and optimize your travel plans.
Review your customized route map
After customizing your route map with multiple stops, it is essential to thoroughly review the trip itineraries to ensure the best possible routes are included within your desired time window. Double-check the route plan to confirm that the most efficient and convenient paths are selected for each leg of the journey. Consider factors such as traffic conditions, road closures, and potential delays to optimize your route.
Once you are satisfied with the customized route plan, access the route directions from the left-hand corner of the map to proceed. This will provide you with a detailed overview of the chosen routes, including important landmarks, turn-by-turn directions, and estimated travel times between stops.
6. Book Your Hotels
To find the perfect accommodation based on my daily itinerary, I start by using Google Maps to plot out the locations I’ll be visiting each day. Then, I use Booking.com’s map feature to search for hotels near those locations. I select a spot near each of my planned stops and add them to my map on Booking.com. After I have marked all the potential hotel locations, I compare the map from Booking.com with my map on Google Maps to find the best hotel spot closest to most of my destinations. I take into consideration factors such as distance, transportation options, and nearby amenities. I can find accommodation that is conveniently located for my daily activities, making the most of my trip. (I also make sure it answers my top 10 questions for choosing a hotel!)

7. Share Your Trip & Access it on Your Phone
Sharing your travel map with your buddies and accessing it on your phone is easy with Google My Maps. To begin, open the Google My Maps app on your device and find the map that you want to share.
On IOS devices, tap the “share” button and select the friends you want to share the map with. They will receive a link to access the map.
On Android devices, tap the menu button and select “share trip.” Choose the friends you want to share the map with, and they will receive a link to access the map.
To access the shared map on your phone, simply download the Google My Maps app from the App Store for IOS devices or the Google Play Store for Android devices. Log in to your Google account, and navigate to the “shared trips” section to view the map that has been shared with you.

FAQs About Planning a Trip with Google Maps
What is the difference between Google My Maps and Google Maps?
Google My Maps and Google Maps both offer users ways to create personalized maps, but they have key differences in terms of features and capabilities.
Google My Maps allows for extensive customization, including the ability to add custom markers, lines, and shapes, along with the option to import and export data. Users can also create layers to organize their data and share their maps with others. On the other hand, Google Maps is more simplistic, offering a basic way to save and organize places of interest with the ability to add notes and labels.
In terms of organizational capabilities, Google My Maps provides a more robust platform for managing and categorizing map data through the use of layers, making it easier to keep track of different types of information. Google Maps, however, is more straightforward and user-friendly for those who simply want to create and manage a list of locations without the need for complex customization.
I prefer Google My Maps for planning a trip, then using Google Maps for navigation (and downloading a map offline for when I don’t have service or wifi).
Can you use the directions layers to navigate on Google My Maps?
Technically yes, but I wouldn’t recommend it. When you’re ready to go, open the regular Google Maps and use that for navigation. Google Maps has real-time estimates for traffic, speed traps, and more.
Simply open the Google Maps app or website and enter your desired destination. Then, select the “Directions” option and choose the mode of transport (car, public transit, walking, or biking) for your trip. After entering your destination and mode of transport, you can then view the different routes and estimated travel times on the map.
The directions layers will show you the various route options available, taking into account factors such as traffic and road closures. You can compare the routes and select the one that best fits your trip itinerary. Once you’ve chosen your route, you can follow the turn-by-turn directions provided by Google Maps to navigate to your destination.
If you don’t have service, be sure to download maps offline so you can still navigate to your destination! Pull up the location area and scroll out until the second destination is in the map. Then click on the “…More button” The option for download an offline map will pop up. Then you’ll be able to use the map for that area without needing wifi or service!
Can you use your phone to create or edit Google My Maps?
Yes, you can use your mobile browser to create or edit Google My Maps. First, log in to your Google account on your mobile browser and navigate to the “Saved” tab to access your saved maps and lists. From there, you can create a new map or edit existing ones. To create a new map, click on the “Create Map” button and start adding locations, routes, and custom markers.
If you want to access your map on your phone while traveling, download the Google Maps app and sign in with the same Google account. This will allow you to access the map on your phone and make any necessary edits or additions while on the go.

What is the limit for adding layers and location pins in the Google Maps trip planner?
In the Google My Maps trip planner, users are limited to adding a maximum of 10 layers and 2,000 location pins. This limit can impact trip planning by restricting the amount of detailed information and destinations that can be included in the trip itinerary.
To optimize trip organization within these limits, users can consolidate multiple locations into a single pin by creating custom labels or categories within a layer. For example, instead of adding individual pins for restaurants, hotels, and attractions, users can create a “Dining” or “Accommodations” layer to group relevant locations together.
Additionally, users can prioritize and carefully select the most essential locations to include in the trip planner to avoid exceeding the 2,000-pin limit. By focusing on key destinations and points of interest, users can effectively plan their trips within the given constraints.
How can I integrate other Google products with Google Maps for trip planning?
Google Maps can be integrated with various Google products for efficient trip planning. Users can integrate Google Drive to access and save relevant documents, Google My Maps to create personalized maps with specific locations and routes, Google Calendar to manage travel itineraries and schedules, Google Photos to view and share trip photos, and Google Sheets to organize and track trip expenses and budgets.
By integrating Google Drive, users can access important documents such as travel itineraries, hotel reservations, and flight details directly from Google Maps. Google My Maps allows users to create custom maps with specific destinations and points of interest, which can then be integrated with Google Maps for easy navigation. Google Calendar can be integrated to keep track of planned activities and appointments during the trip. Google Photos integration allows users to view and share trip photos directly from the Google Maps app. Additionally, Google Sheets can be used to track and manage trip expenses and budgets, which can be accessed and updated alongside Google Maps. (This may be a whole other post in the future. Let me know if you would like that in the comments.)
How do I save a Google My Maps itinerary?
To save a Google itinerary, first, open the itinerary in Google My Maps. Then, look for the bookmark icon or “Save” button in the map editor. Click on this icon or button to save the itinerary to your Google account.
To access the saved itinerary later on, navigate to the “Saved” section of Google Maps. Log into your Google account on Google Maps, and select the “Menu” icon. Then, choose “Saved” and “Maps” to view the list of saved maps and itineraries.
How do I send a Google itinerary?
To send a Google itinerary, open Google Maps, and select the itinerary you want to share. Then, click on the “Share” button from the menu. Choose a sharing option, such as email, messaging, or social media. Enter the recipient’s email addresses in the designated field. Customize the message as needed by adding a personalized note or additional information. Once the message is ready, click “Send” to share the Google itinerary with the selected recipients. Alternatively, you can also copy the link provided and manually share it with the intended recipients.
Make sure to select the appropriate sharing option and enter the correct email addresses of the recipients to ensure they receive the itinerary. Customizing the message allows you to provide any additional details or context about the itinerary.
How do I find my Google itinerary?
To find your Google itinerary, first, open Google Maps on your computer or mobile device and log in to your Google account. Once logged in, select the “Menu” icon in the upper left corner of the screen. From the menu, choose “Saved,” and then select “Maps.” Here, you will see a list of your saved maps and itineraries. Look for the itinerary you want to view and click on it to open and view the details.
Why should I use Google Maps to design my own vacation?
Google Maps trip planner offers a multitude of features for designing a vacation. It provides access to detailed destination information, such as reviews, photos, and popular attractions, allowing users to make informed decisions about their itinerary. The customization options enable users to tailor their trip according to their preferences, including selecting specific modes of transportation, adding multiple stops, and choosing different routes. Real-time updates ensure that users receive the most current information on traffic, transit schedules, and potential delays. Additionally, the seamless integration with other Google products, like Google Calendar and Gmail, enables easy organization and sharing of travel plans with friends and family. The collaboration capabilities allow for multiple users to contribute to and edit a shared trip plan in real-time.
Using Google Maps for trip planning offers numerous benefits. The platform is intuitive and easy to use, making it accessible to all levels of travelers. Users can save their favorite locations, creating a personalized travel database for future trips. Moreover, the ability to organize itineraries with detailed information, including addresses, hours of operation, and contact information, streamlines the vacation planning process. Overall, Google Maps trip planner is an essential tool for designing a vacation, offering a wealth of features and benefits to enhance the travel experience.
Final Thoughts
Google My Maps is my favorite way to plan a trip (and save future trip ideas for later). I hope this will inspire you to make your own, or a few, custom maps!
Save “How to Plan a Trip with Google My Maps” for Later!


About the Author
Read More About General Travel Tips


9 responses to “How to Plan a Trip with Google My Maps”

I do use Google Maps extensively on my travels.
I have found them to often be the most informative and extensive and generally fulfil my needs for a well put together map. I occasionally, however find that locations are misplaced, even if only by a few streets, and that can confuse the heck out of me.
Your extensive guide has definitely shown me more than I knew about these maps and I learned a few tricks from your explanations to make my use of these maps more efficient for me.If you are someone about to embark on a trip or a first-time traveler, Google Maps is a savior. This is one way of saving a lot of time and can really help in organizing the experience like seeing one landmark to the next or where to stop to grab a good drink on the way. While I occasionaly use it for very specific reason when traveling, I am the type who prefers to get lost and wander around and let my nose, eyes and instincts point me to where I need to go next 😉 #flyingbaguette
I agree with you… My Maps is crucial for my planning. I am very visual and seeing the places I want to visit on a map helps me to organize in a coherent pattern. I do hit the limits fairly frequently on my long road trips, which can be frustrating. I do use it much as you’ve described.. planning on My Maps but navigation on Maps.
I also like Google Travel which consolidates a lot of the planning.
This is a valuable post for those who haven’t tried out My Maps. Your directions are very clear and precise.
We use Google Maps a lot during our trips, and particularly like the downloadable feature for offline navigation, but have not yet explored My Maps, something we should remedy immediately! What a useful app. Your guide is excellent – it contains very clear instructions on how to make use of its features. We are currently planning a road trip so have bookmarked this guide – you may just have revolutionised our itinerary planning! Thank you for such a helpful post.
I’ve used Google My Maps once or twice but realize now that I haven’t been using it to its full potential. On top of this being practical and helpful for planning, it also just looks a lot of fun to create different maps. good to know about the directions, and the limitations, although I think it’s highly doubtful I’ll need 2000 pins. Thanks for the introduction and the detailed review of how to create these maps
I use Google Maps mostly for pinning places of interest and have found a few gems whilst scrolling and scanning a destination before my visit. It is one of my favourite tools to use when I plan my trips. Unfortunately, Google have changed the layout of the maps and they are now a bit sketchy whenever I try to use them offline.
Carolin | Solo Travel Story
Is there someone who understands me and who talks about an authentic philosophy of life: creating travel itineraries with the help of Google Maps 🙂
I have a whole set of maps that I created as an aid to my travels. Today they serve as a reminder of the places I visited and also as a basis for others to benefit from the information.
Your guide explains everything very well and has very good tips for those who want to be part of the “team that makes maps for everything” 🙂unless they have changed things recently or I’m not understanding, why in the world would Google not allow the integration of Google my maps with regular Google maps. I’ve gone to all the trouble of creating maps with multiple layers. why then should I not be able to actually use that for navigation. I’m talking about above and beyond just using the directions function in my maps and having to read the directions.
It’s one of my biggest pet peeves! I couldn’t agree more!
Leave a Reply